Understanding your customer purchase behavior is critically important for your brand’s growth. If you have customers filtering into your e-commerce site, you undoubtedly want to know more about them. Who are they? What demographic data do you have for them? How can you find any and all unique identifiers for your customer base?
Who are your most valuable customers and why?
You have a treasure trove of data about your customers and you need to use it! With the right tools for analysis along with careful segmentation, you can opens the door to huge growth potential by better understanding your customer behavior.
Creating strategic customer tags in Shopify makes for some of the most important segmentation for DTC brands. This allows you to create customer segments that are tailored to answer your most crucial questions, which unlocks valuable patterns in your customer behavior.
Understanding more about your customer and building personalized messaging with hyper-targeted audiences pay off. In fact, a recent McKinsey study found that companies who excel at personalization see up to 40% more revenue from marketing activities than the average brand who does not personalize their messaging.
Let’s go over how you can use Shopify customer tags to gain more insights and grow your business through more targeted marketing initiatives. This article will cover:
- What are Customer Tags?
- How to Tag Customers in Shopify
- How to Automate Customer Tags
- How to Segment by Customer Tags in Peel
- How to Elevate Your Game with Custom Segmentation
What are Customer Tags?
Customer tags are specially named labels that merchants place on customers or customer groups within Shopify. This facilitates easier analysis and segmentation of customers who have specific commonalities.
A customer tag is used to categorize or organize customers into groups. For example, customer tags can be used to control the usage of discount codes. Tags can also be used to control access to certain areas of your store. The majority of our merchants use customer tags to segment their customers into marketing lists based on their purchasing behavior.
Applying tags to customers can help you filter them based on a particular set of criteria that is relevant to your business. For example, you might want to filter wholesale customers, loyalty program customers, or other types of customers who make purchases on your site.
When it comes to using these tags to segment your customers, the idea is that you can see how different types of customers are spending, when they are making their purchases, and other patterns in their data.
How to Tag Customers in Shopify
Naturally, the next question is how to create customer tags in Shopify. Luckily, they make it super easy to navigate.
You can add custom tags in your Shopify sections, which include:
- Product
- Transfer
- Customer
- Blog Post
- Order
- Draft Order
So, keep in mind that you have other tag types you can use for segmenting your e-commerce data. For our purposes, we’ll focus on customer tags. Here are the 3 easy steps for creating your customer tags in Shopify:
- Open the specific customer page that you wish to tag in Shopify.
- Find the Tags section (bottom right of page) and either type in the tag you want to create, or select a pre-existing tag that you’ve created.
- Click Save.
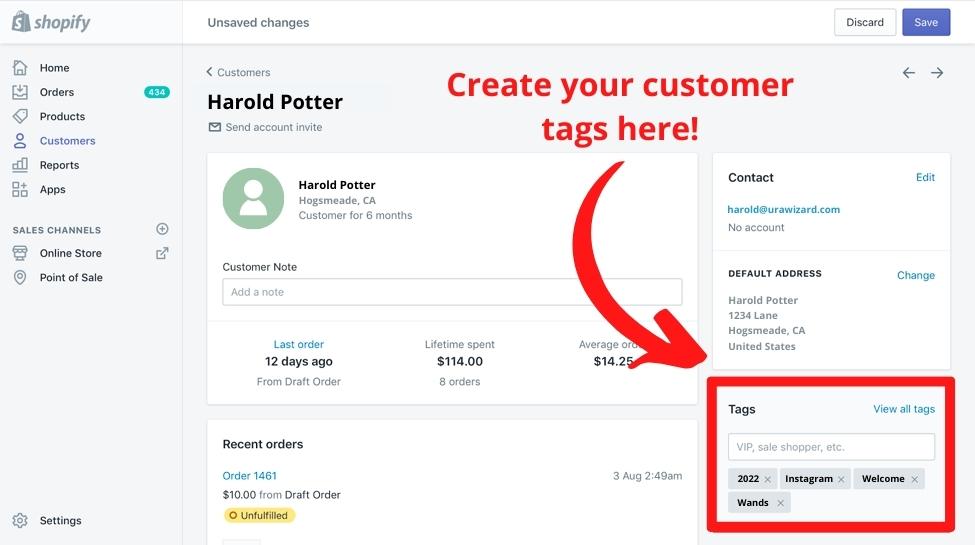
It’s THAT easy to create your customer tags in Shopify. If you want to remove customer tags or add tags in bulk to speed up the process, we’ll refer you to Shopify’s tag guidelines in their official help center.
A few helpful tips to keep in mind when creating customer tags:
- You can use up to 255 characters in your customer tags - don’t be afraid of details!
- You can add up to 250 tags to an individual customer - get creative, but remember: the cleaner the better!
- If you create a customer tag, don’t expect it to show up in your other sections (products, orders, etc.), as it won’t be copied to the others - probably for the best to keep things organized!
- Your customer tags (and other tags for that matter) are NOT CASE SENSITIVE - see what we did there? Don’t expect to make unique tags by only changing the first letter to a capital!
Creating customer tags is dual purpose; not only does it help you clean your data, making it more organized and manageable, but it also facilitates segmented analysis and targeted messaging.
Automating Your Customer Tags in Shopify
So, we’ve covered how to manually add your customer tags in Shopify, but what about if you don’t want to do that by hand? Manually tagging your customers can be an incredible time commitment, when your team could better allocate that time to improving your marketing strategy.
The solution: automated customer tagging tools.
Some of your tools – like customer loyalty apps, reviews, surveys or subscription tools – may automatically create customer tags based on attributes specific to their functions. But, there are apps designed specifically to help Shopify merchants save time on customer tagging by creating automated workflows that assign customer tags based on a defined set of criteria. Think of the time saved in creating a workflow once and having hundreds or thousands of customers automatically tagged when their order meets the criteria, rather than manually tagging.
This can be crucial in creating a more efficient system for your team. Here are some tools that can help you get started:
Auto Tags Customer & Order by Apps on Demand - This is a simple and trusted way to get started with your auto-tagging. The app allows you to simply set up a rule and when an order matches that rule (or new customer signup matches that rule), the app automatically assigns the appropriate tag.
Their free version allows you to create one rule or they have a paid version that allows you to create unlimited rules and allows for bulk previous order tagging or bulk previous tag removal. This app is super handy for saving time and creating simple rules for order management and future segmentation.
Customer Tags and Segments by Shop Circle - Another auto-tagging tool that helps you to streamline your tagging process. They allow you to use multi-condition workflows to have customer tags automatically created based on customer behaviors. Their tools help you create defined customer segments that you can leverage for further marketing automation - like targeted messaging for different segments based on their purchasing patterns, products purchased, or other needs.
Examples of customer tags they suggest include:
- Bargain Hunters - shops sales
- Loyal Customers - purchased multiple times
- Brand Advocates - subscribed to marketing
- Big Spenders - spend over a certain amount
- Trend Setters - shop new products/collections
- Locals - customers in a nearby geographical location
- Students - shop with student emails
- Location - shipping country
That’s just scratching the surface of the tags you can create for your customers. We have seen examples of people tagging people by survey responses, whether the customer also bought on Amazon, if they signed up for the newsletter, their loyalty program tier, if they are an affiliate, came in from a specific channel. Customer tags can be anything that you want to label your customers!
Alloy Automation - Alloy specializes in helping you create automated workflows for tagging customers, which takes the manual burden off you and your team. They’re auto-tagging experts with over 100 app and platform integrations to help seamlessly fit into your tech stack.
What does this mean with Peel?
Most importantly, if you use any of these auto-tagging tools, you’ll be able to segment your post-purchase data by those customer tags, to get closer to the stories and trends at hand in your customer behavior. Let’s go over how to segment by customer tags.
How to Segment Your Data by Customer Tags with Peel
When you use Peel, your Shopify data is automatically pulled for analysis. This means you have access to a wide array of metrics that you can dig into to better understand your customers’ purchasing behavior.
If you’ve followed the steps above, and thoughtfully created customer tags in Shopify, or have a system in place for automated tagging, you can dive into an extra layer of granularity in your metrics in the form of customer segments. Your customer tags automatically carry over into Peel, giving you the power to segment by them in just a couple clicks!
Let’s look at a couple examples:
Let’s say you’re interested in the lifetime value (LTV) of your monthly cohorts (customers grouped by the first month in which they make a purchase with your brand). Here’s what that Cohorts Revenue metric looks like in Peel:
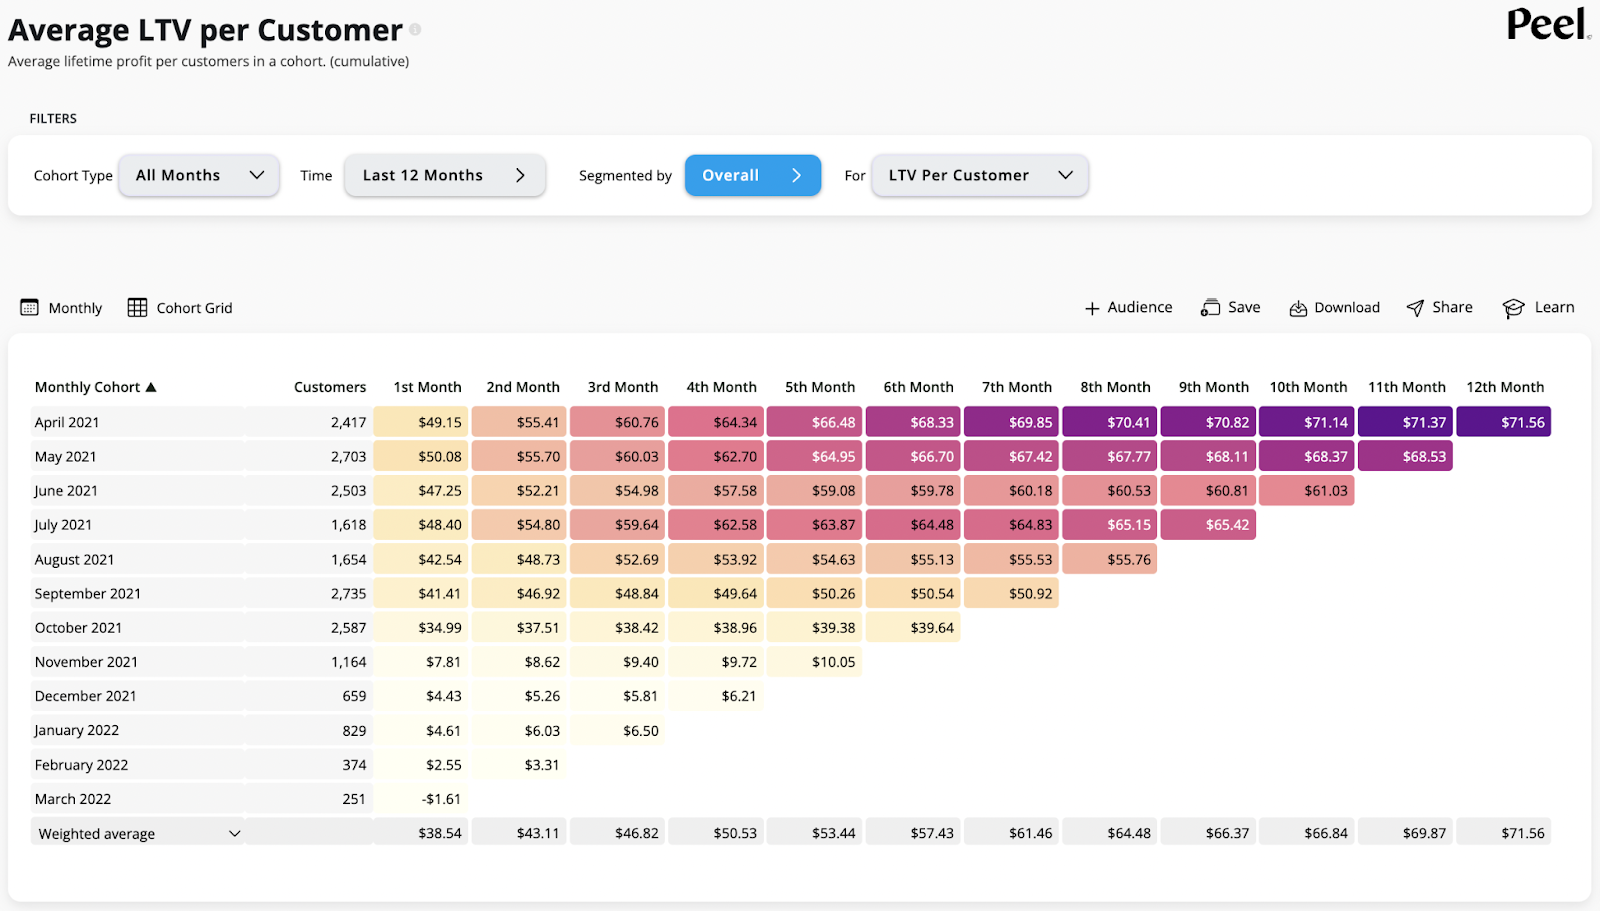
From here, all you have to do is click the button that says, “Segmented by” as shown below:

This brings up a pop-up menu where you can scroll to the “Customers” section (on the left hand side of the pop-up window) and click on “Customer Tags.” Here’s what it looks like:
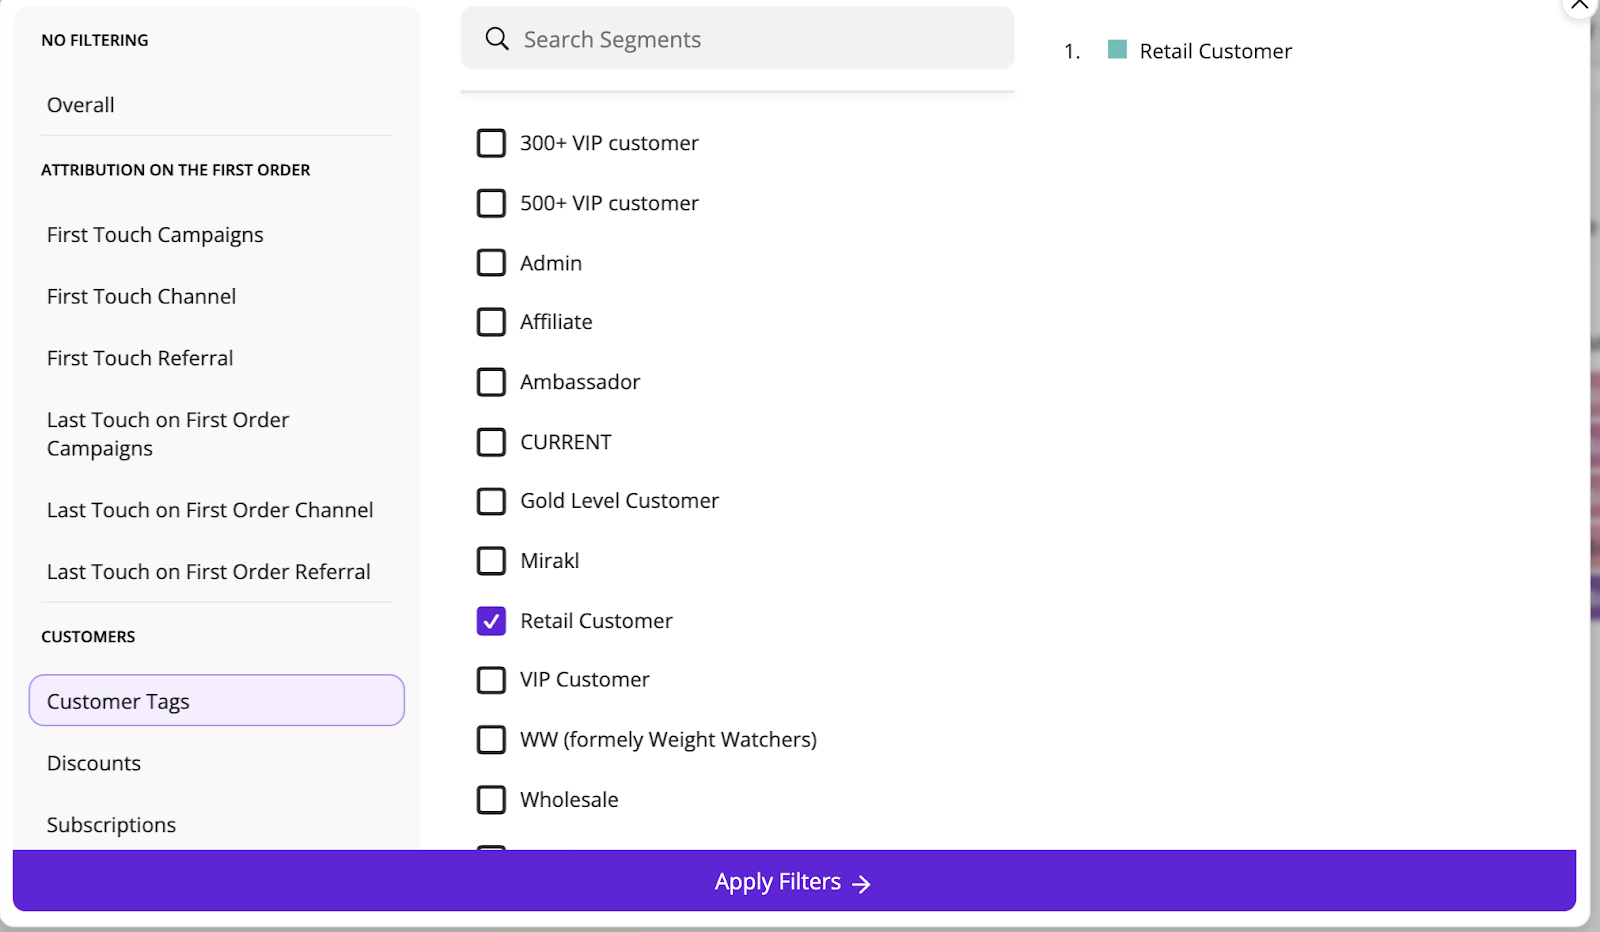
From there, you can check the box of the customer tag you want to segment by (in this case we went with “Retail Customer”) and click the purple “Apply Filters” button at the bottom of the pop-up window. Here’s what you get:
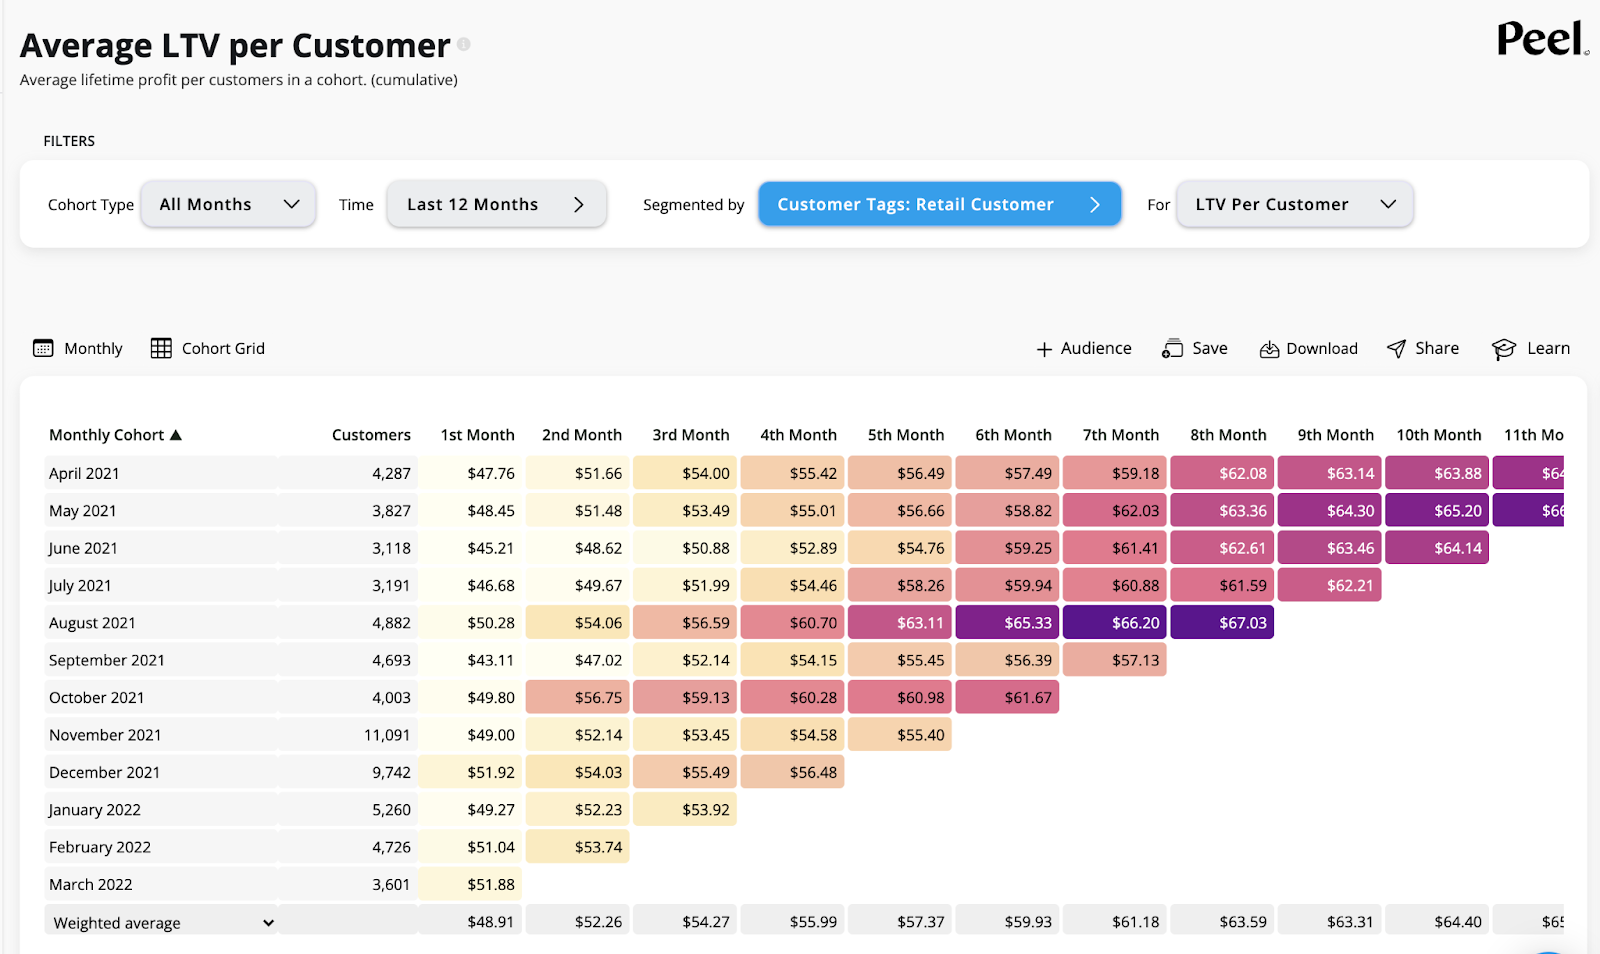
As you can see, this allows you to look at the LTV of your customer cohorts segmented just by the customers who you have labeled as “Retail Customer.” This is highly relevant data because if you are trying to figure out which of your customer types are bringing the most value to your store, and in which months you are acquiring those customers, this is exactly how you do it!
What can you do with this information?
Lifetime Value (LTV) is one of the metrics our customers desire to learn the most about. LTV is important because it shows the value that your customers are bringing to your store, and if that number is growing over time, you have a healthy strategy on your hands.
This info can lead to a ton of insight-driven actions. Segmenting your LTV by customer tags helps you see who your most valuable customers are, and then you can assess how you are engaging those customers.
- Is a certain customer group more valuable to your brand??
- Are other groups getting newsletters with content that is helping them convert?
- Do you have a customer loyalty program with customers tagged accordingly that are purchasing on a regular basis because of incentives like points and other rewards?
- Do customers who are a part of a gifting initiative – are they more loyal? Aka did that gifting program work?
Viewing the patterns in your customer lifetime value from one customer tag segment to the next can unlock the answers to these questions. From there, you can adjust your marketing strategy from retention emails, to SMS cadences, to ads and more, to lean into the actions that are working and improve or eliminate those that are driving in less valuable customers.
As we mentioned at the onset, the more you understand about your customers on an individual level, the more you can tailor your marketing content and messaging to deliver what resonates with them. This is the best way forward for both building customer loyalty and creating a recipe for more conversions.
Before you go, one more look at another way to segment with customer tags!
Another quick example:
Let’s say you want to learn more about your customer’s Average Order Value (AOV). This tells you, on average, how much your customers are spending each time they purchase. A hugely important metric to track and try to maximize.
The process is very similar! You scroll down to “Orders” and click in your main Peel menu. Then you click on “AOV.” This will bring up your average order value over the given period (you can change that time range as you wish - with the “Time” button near the “Segmented By” button used earlier).
From here, you can use the same “Segmented By” button as before. The pop-up window will appear and you’ll scroll to the “Customer” section and click “Customer Tags” again.
Here’s where things differ slightly! When you’re looking at a set of metrics outside of your cohort metrics, you can select multiple items to segment by. In this case, you can choose multiple customer tags, which will allow you to visually compare them in your chart. You can manually click to select the customer tags or use the convenient Top 3, Top 5, or Top 10 buttons to have them automatically select the tags with the highest value customers for the given metric. Here’s what the pop up looks like when you have the option to select multiple tags:
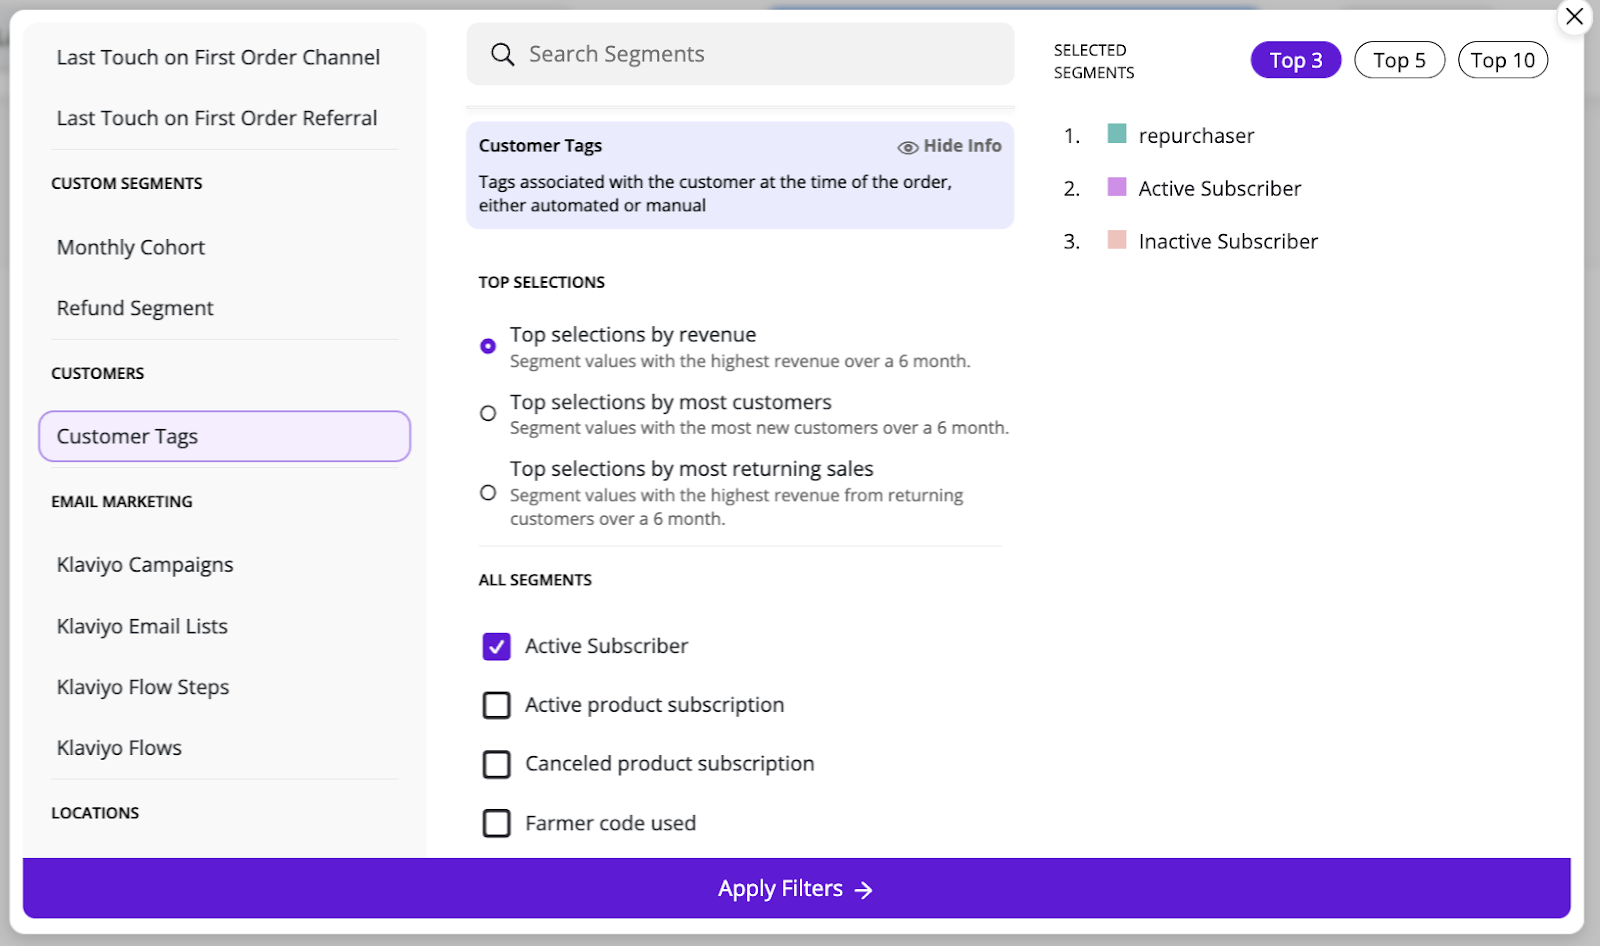
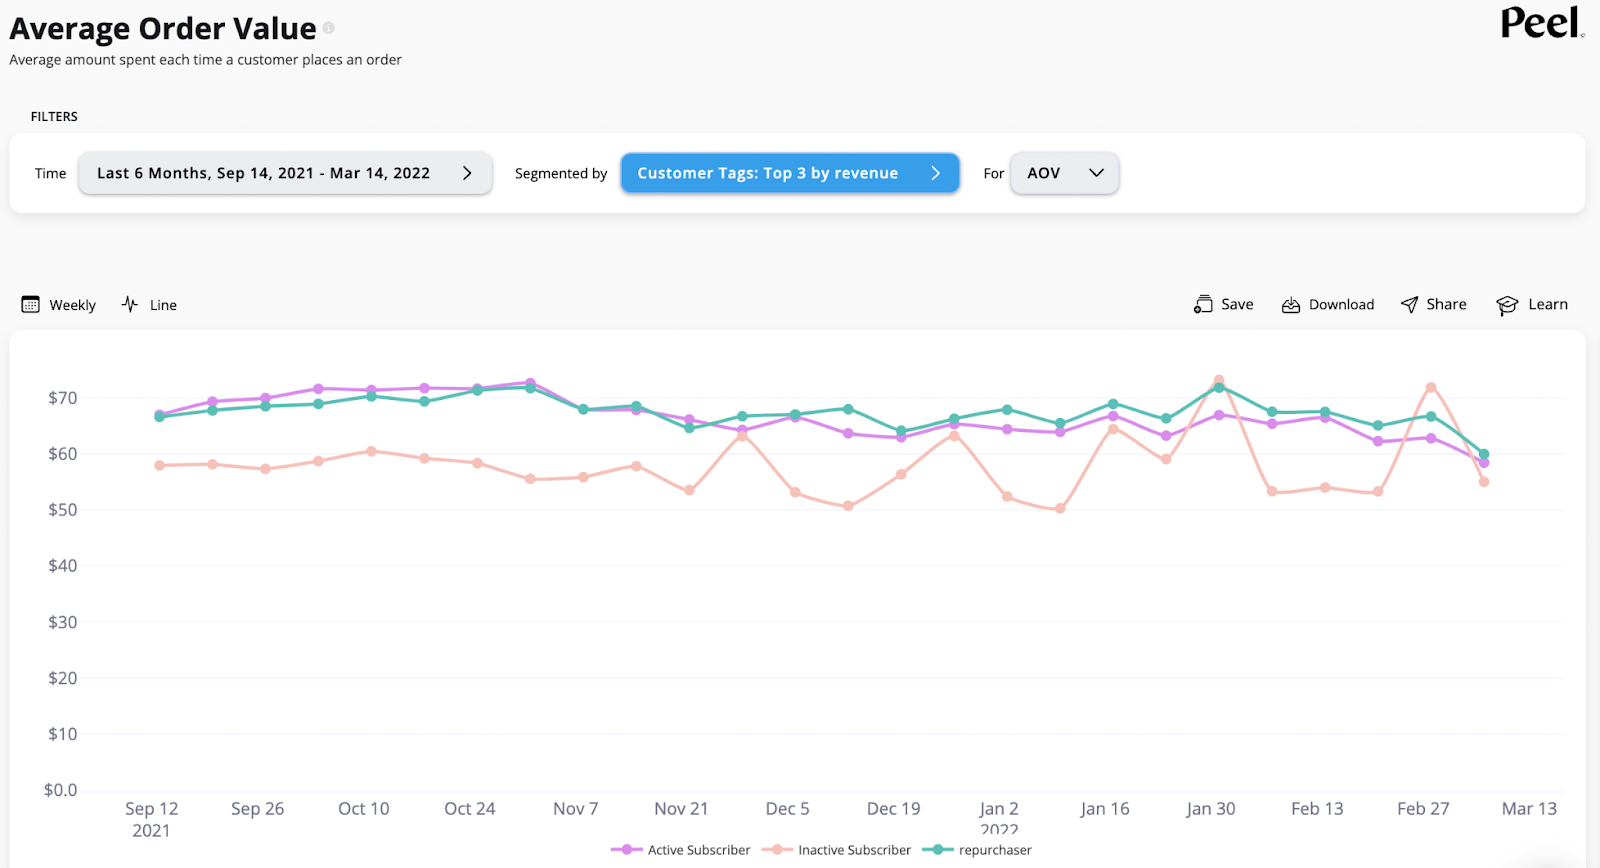
After you click apply filters, you have a super handy comparison of your customer segments in a visual way that’s easy for your team to sit down and discuss! Check it out:
What do you do with your segmented AOV information?
Similar to your LTV insights from earlier, you can get an idea of how different customer groups are making purchases on an individual level. You want to do everything in your power to get customers to convert with more value in their carts.
Which customer segment had your best AOV? Why? Did they get a retention email with relevant product suggestions based on their previous purchases? Did they get ads for new product bundles that increase average order value? Which of your marketing experiments is getting these customers to check out with more?
The visual comparison chart, with multiple customers shown at once makes all of this so much easier! If you want to learn more about segmentation, building hyper-targeted audiences, and using Peel’s metrics, check out our full Guide to Ecommerce Analytics.
Customize your Segmentation with Peel
We have customers come to us with all different ideas for tagging customers and creating custom segmentation. We know merchants who want to understand the efficacy of their loyalty programs – how LTV and total revenue are affected by customers enrolled in their loyalty rewards – while other merchants want to analyze things like repurchase rate by size of household (which they may get in post-purchase surveys).
Peel accommodates all of these and more. By creating custom tags in Shopify, our customers can dive into their post-purchase data and easily find their custom segments for any metric in just a few clicks. We love customization.
Peel also allows you to bring in custom data, which inherently lives outside of Peel, via CSV download. Think of customers who get physical media from you like catalogs, flyers, or gifts. They represent the opportunity for heaps of important analysis, so if you have that customer data living in a CSV, you can upload it to Peel with the easy drag-and-drop feature and get to segmenting by those customer tags.
Ready to jump into tagging your customers and segmenting them with easy-to-use analytics tools? Get a 7-day free trial and experience how Peel supercharges your analysis.


.webp)


.avif)


.png)


.svg)
.svg)